Not for techies: NFTs for everyone–Pt. 1
In part one of a three-part series, our guest writer, Roberto Cano, shares how to get started on building your NFT empire, even if you don’t know the difference between Remix and Rinkeby.
Welcome to the NFT world, my friend! NFTs are the buzz-word nowadays. Everyone is crazy about buying them, and even more people are crazy about selling them. What kind of crazy are you? If you’re in the second group, you are in the right place!
This series is intended to get you into Ethereum development by creating your very own NFT. It tries to simplify the process as much as possible. However, it’s still a technical article, and you will need to be comfortable with being a bit uncomfortable and handling some code.
The series consists of three articles in which we will explore how to create an NFT from scratch, deploy it to mainnet, and finally, list it on OpenSea. Say what?! If all goes well, you’ll also be able to list it there, and who knows–maybe even sell it?
Our journey will bring us to the following exotic places in three installments:
-
- First Gear
- ERC721, the secret identity of an NFT
- Remix IDE, or how to deploy an NFT directly from your browser
- Niftie!, your very first baby NFT
- Second Gear
- Rinkeby, the gas-saver god that will allow you to test your NFT without spending a penny
- IPFS, the Interplanetary File System that will skyrocket your art piece
- Hitting a Pinata, or how to make your art stick hard and not get lost
- Sailing with your NFT into the OpenSea (and not getting stranded)
- Full Throttle
- Floating high with the OpenZeppelin while avoiding the Hindenburg effect
- NFT for real: going full Main…netand living the dream life
- First Gear
Are you excited? I definitely am, and we are ready to go! Before we start, let’s just hear a few words from our Disclaimer team.
Disclaimer
This guide assumes you already know a bit about Ethereum. You should, at the very least, have a functioning wallet and have your wallet address at hand. If you don’t, you can install Metamask by following this article:
https://metamask.zendesk.com/hc/en-us/articles/360015489531-Getting-started-with-MetaMask
First Gear
Here we are! We’ll start slow and make our way through the slippery paths of the Blockchain. By the end of this article, you will have the basic outline of an NFT. It will not be the prettiest one, but it will be set up for success.
So, you have used Ethereum, own a wallet and have even tried some of those brand new DApps, right? Have you ever wondered about how all of that works? What’s the primordial engine that moves this awesome machine? Well, let me tell you: it’s developers. Ok, it’s actually code, but developers are the ones writing it–that yummy, juicy code that controls everything that is done in Ethereum.
In the Blockchain, this code has a very unique name: Smart Contracts. They are Contracts because they establish a set of immutable rules that everybody has to abide by, and they are Smart because they can adapt to different situations and scenarios, since they are made of code. Typically, these Smart Contracts are written in a programming language called Solidity. Solidity allows you, the programmer, to define the set of rules that the contract will enforce, and that will give you all the power of a superhero!
“Ok, so what?”, you may be thinking. “What does this have to do with NFTs?”. Well, my friend, this is all relevant because NFTs are nothing more and nothing less than Smart Contracts! They’re just pieces of code that tell Ethereum how an NFT looks and who owns it. This code needs to have a certain structure and comply with a specific interface, which is the set of functionalities that it offers.
The interface that makes up an NFT has a very particular name: ERC-721.
ERC-721
Okay, yeah, it sounds like something radioactive from a James Bond movie, but that couldn’t be further from the truth. This fancy name defines the characteristics that a Smart Contract must have in order to become an NFT. ERC stands for Ethereum Request for Comment,and it’s just a set of rules that applies to a Smart Contract. If your contract follows those rules, everybody else in Ethereum can communicate with it (nobody wants to have a Forever Alone contract). It also defines what your contract can and cannot do.
More specifically, the ERC-721 defines what is called a Non-Fungible Token, or NFT. Non-Fungible means that your token is unique in the billions of things that exist in the universe, rather than Fungible–which describes when all tokens of the same type are interchangeable. Bitcoin, for example, is fungible. One Bitcoin is exactly the same as another Bitcoin, and both have the same price.
“Well, what kind of rules must an NFT have to become a realNFT?” asked Pinocchio.
I’m glad that you raised that question! Before your very eyes, behold, the rules of an NFT:
- It must have a long nameand a short name
- It must have an owner
- It must have an image attached to it
By following these rules, a Smart Contract becomes a real NFT. It will be alive on the Blockchain and it will be able to interact with other contracts.
So far, so good! The next thing we need to do is write these rules in the language of the Ethereum gods: Solidity. To do it, we will use the preferred tool of choice for these shenanigans.
Remix IDE
“MC’s in the house!” I hear you shouting, thinking this is an obscure DJ set in some club nobody has ever heard about. No, my friend, not quite. This is the most important tool for a Blockchain developer: a code editor!
An IDE, or Integrated Development Environment, is a tool that allows you to write and execute code on your computer. Typically, IDEs have been notoriously cumbersome to install and even more difficult to use. Today, thanks to the power of the Web, we can use something like Remix, an easy-to-use, browser-based editor with the power to build Smart Contracts.
Remix can do many things, but the ones we are interested in are:
- Code editor: so we can write our NFT code
- Compiler:this will check our code and translate it so Ethereum can understand it
- Deployer: So we can upload our NFT to Ethereum
To get started, go to https://remix.ethereum.org/ and you will see something like this:

This is the Remixeditor. On the very left, you will find the different tools the editor has to offer, like the Compilerand the Deployer(more on the Deployer later).Next to it, the Project Tree, where you can see some files like the README.txt and some folders. On the Editor Window, you will see the Home tab. Here is where you will also see your code when editing your Smart Contract. At the bottom, you can see the console window, where we can check for the result of our actions in the environment.
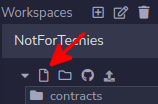
Now let’s get our hands dirty! First of all, let’s create an empty contract. You can do this by clicking on Create new file on the project tree.
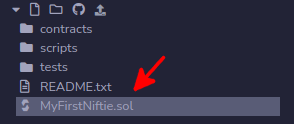
This will create a brand new file that you need to name. Let’s call it MyFirstNiftie.sol.
Next, we need to write the initial lines of our little NFT. This is called the header, and it includes the license and the version of Solidity that the contract is written for. The license tells the rest of the world if your code can be copied and how. The version of Solidity tells the Compiler which set of features you are able to use. For now, let’s go with the standard config: MIT License and the latest major iteration of Solidity: 0.8:

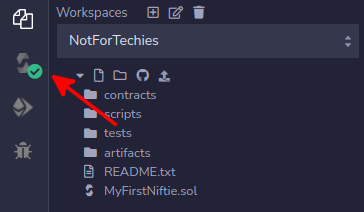
Just copy/paste it into MyFirstNiftie.sol and save it with CTRL-S. The moment you save it you should see how Remix processes the file and gives you a green tick!
Now we can really start writing our own NFT!
Niftie!
Well, now we’ve come to the real deal–the creation of our first NFT–and we are going to do it like the pros: by writing some Solidity code.
Remember, we said that our NFT needs to provide some information about who she is to the rest of the world. To do this, we need an NFT outline. This outline is the minimum lines of code we need for any Smart Contract:

With that initial code, we can start adding properties to our NFT that will transform it into a real one. Remember to write the rest of the code where it says:

Name and Symbol
Our little Niftie has been named by us, but nobody else knows her name. For everybody else to learn it, we need to declare it in the contract. Earlier, we established that an NFT has a short nameand a long name. These are represented respectively by a nameand a symbol, and they will identify the name of the NFT collection we are creating:

These are called variables in Solidity. They are of type string, which basically means that they are text. They are then declared public, which means that everybody can read them. Finally, they specify what they are (name and symbol). After the declaration, they have their values assigned. Basically, these two lines say, “Hey, my name is Niftie, but you can call me NFTY for short!”.
Why did we say this a Collection? Because with a single NFT contract, you can have a collection of NFTs! We won’t dive further into this, as our little Niftie will be a collection of just one NFT, but I’ll leave it here, just so you know the nomenclature.
Owner
NFTs are like Pokémon–they really like having an owner! In this case, the owner is described by a wallet address. Remember when we talked at the beginning about having a wallet, and I shared the link to that Metamask article? Now is the time to use it! Add the following line to the contract:

Then you must replace <Your address here> with your actual address. It should look something like this:

This tells the rest of the Blockchain that this NFT is yours! It will help later when we want to add the NFT to OpenSea.
If you are wondering what that address[] thing is about, I can tell you. Address indicates that the ownerOfthe NFT is a wallet address. The two squared brackets are used because in more complex NFTs you may have a different owner for each NFT in the collection, meaning you could have something like this:

The above code would indicate the owners for the NFTs 0, 1 and 2. Again, because our NFT Collection is very unique, it only has one NFT and you are the only owner!
NFT Art
Art is the most important part of an NFT! It’s what makes an NFT truly unique and interesting.
In an NFT, the ART is represented with a URL. A URL is your typical internet address: something like http://gun.io, for example. For our NFT, you will eventually need a URL that points to your awesome art. We won’t be including your art just yet. This will be explained in the next article. However, we will include the variable that will point to your precious art.
This variable looks like this:

You can leave the <some URL here> text, or you can include something you like. Just remember to write your text between the double quotes “ “.This will help us in the next article when we will upload your art.
Same as with the ownerOf, you could have a different URL for each NFT, but for our purposes, one will suffice.
Deploy
Okay, we have the NFT code ready. Now what? We can test it in Remix to make sure everything works as expected. First, make sure this is what you have in the contract:

Next, make sure that Remix has validated your code and is showing a green tick:

Now we will Deploy our NFT. Deploy means to upload your contract to the Blockchain. For now, we will use a local blockchain the Remix provides for doing tests, so we can check what we are doing. Click on the Deploytool on the left bar of the editor.

You will notice that the project tree has disappeared, and you have the deployment tools in its place. In the section called Contract, you should see the name of your NFT contract:
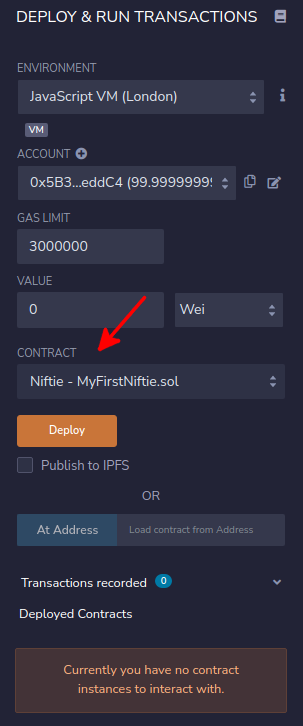
We are almost there! Click on the Deploy button:

You should see that a new item named NIFTIEappears below, under the Deployed Contracts section:
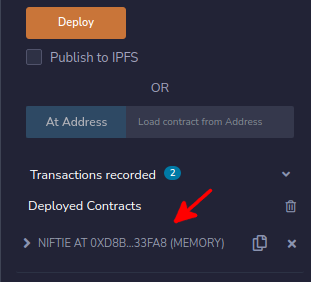
If you click on the arrow to the left of NIFTIE, it will display your NFT properties:

Here, you can click on name or symbol, and you should see those properties being displayed behind their sections:
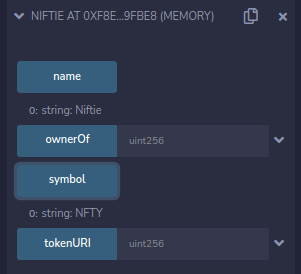
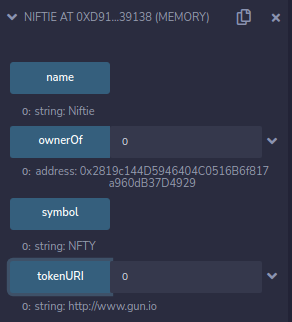
Last, but not least, check the tokenURIand the ownerOf. For this part, you need to input the number of the NFT that you want to check. Because our NFT Collection has only one item, we want to access the URI and the owner for our first item. NFT Items always start counting at zero, so you need to input “0” to the right of ownerOf and click on the blue button. You can do the same for tokenURI.When finished, you should see that the contract is returning the values that you configured in the code!
Wrap up
And that’s it! Congratulations! You’ve created your first NFT. Now she can tell the world about her name, her type, her owner, and her art! Exciting!
We’ve also demonstrated that we can upload the contract to Ethereum, however the deployment we’ve done is not a real one–just a simulation to test that everything is correct.
Now that we have all the ingredients, we can move on to the next step: uploading our NFT to an Ethereum test network. In that test network, we’ll be able to see our NFT being listed in the test site of OpenSea, which means that we’ll be one step closer to making our NFT come alive.
Stay tuned, and make sure to check for the next installment of the series, coming soon! See you there, my fellow developer.
Roberto Cano is one of the many talented developers available to hire on the Gun.io platform. Check out his profile, or head over to his personal website, thesolidchain.com.
Interested in working with Roberto, or one of our other amazing devs on Gun.io? We specialize in helping engineers hire (and get hired by) the best minds in software development.